Friday, November 16, 2012

To Color Or Not to Color...

       Hi everyone.  I am sure at this point you have your Thanksgiving menu planned, your shopping list written and your "Black Friday" plans made.  Here at my house its total panic. I finally looked at the calendar and realized that Hanukkah is very early this year. Just three days after my 11 year old turns 12.  OMGosh I have just three weeks until Hanukkah.  I better get going. I need to find a short cut.  I need to get those presents wrapped and I need to get my gift tags made.  How am I going to do that???

     Lets talk about the digital stamps from Scrapper's Delights. Did you know that when you buy a stamp set from Scrapper's Delights you get not only an uncolored version but a colored version. I found my short cut!  I chose to use this little beauty on my Hanukkah gift tags.  Check her out here!  Since I have two little girls I knew that the chances of the tags surviving the gift opening frenzy where slim to none, I didn't want to spend hours making each tag.  I did want my gifts to be beautiful, complete with gorgeous tags.

    Well this is where I took advantage of the fact that at Scrapper's Delights gives you a choice to color or not to color!  I didn't color but I did embellish. Lets take a look at what I did on my tags.
Now this is what I did. After I added the sentiment underneath the digital stamp I printed her out and trimmed the tag down to size. Then I punched a hole where the button on her hat is and inserted a brad. I then put glitter pen on the brad and waited for it to dry. Once that was dry I cut out the slits for the ribbon that would be woven through the tag. When that was done I used my decorative corner rounder and jazzed up the corners a tad bit. Then I went over the white parts on the image with white puffed paint. This gave her some texture. I used glaze pen on her hair to brighten up that pretty red and on her eyes.  I then sponged a tiny bit of shimmer onto the rest of her dress. One the ribbon was woven through and tied I was able to attach her to the present.

What do you think of the outcome?  Let me know in the comments section.
You all have a fantastic Thanksgiving!!
Cheers,
Laurie

Wednesday, October 31, 2012

Happy Halloween


Hi everyone, as we crafters are apt to do...the day of one holiday we start planning our projects for the next! Sometimes during that process we make some design or technique choices that just don't work out!  Let's take that journey and see where I what I end up with. After that I have a funny story to tell you all. I am sure most of you can relate!
So let's take a look. I used the Autumn Nymph Image from Scrapper's Delights.

Step 1:  The first thing I did was print out the image twice.
This allows for any mistakes I may make in coloring. Most times while I am coloring in the minutest detail....that is when the dog decides to jump on my lap. So you can see I printed our little beauty out twice. I used Copic paper in my printer because that seems to work the best when using Copic Markers.


                                                              Step 2:


Well I decided that I wanted to do some inking and thought this shape would be perfect. But once I got the mask cut out I didn't think it worked so well. So on to the next! I chose a softer scalloped edge.


 Step 3: The Inking.

The photo on the left is my first attempt. What if I lightly went over the whole image. I was amazed at how little I liked the way it turned out. So then...Oooh I could use the cut out of the mask and use it to cover up the image and ink around it!

Step 4:

As you can see I liked it. so I matted the image and colored it in with my beloved Copic Markers. Then the next adventure was.. I had this beautiful image, colored, matted and glitter penned. What do I do with her now? Should I make a card? A Scrapbook Page? A Tag perhaps?  Then it hit me...Thanksgiving is coming up and with Thanksgiving comes food...lots and lots of food. And what do you do when you have a lot of people and a lot of food?  You create a Buffet!

                              Step 5:
After matting the image on a piece of golden card stock. I printed out the Pumpkin Pie sign and then inked the edges of that. Added a pretty brown bow and a Pumpkin Pie.

Ok so here is the Pumpkin Pie Adventure Story:
I ordered a beautiful pumpkin pie from our local grocer. The pie was beautifully decorated. I was so happy because I could get the pictures done ahead of schedule and in some outstanding lighting. Well I happily took this beautiful pie to the register to pay for it. At this point I handed the pie to the clerk and since the price tag was not on the top of the box the clerk flipped it over. Yes he took my perfect pumpkin pie and flipped it over. The shoppers in line behind me gasped. I was like "Seriously? You really just Seriously flipped my pie?"  So then I was thinking...OMG I have this beautiful pumpkin pie sign and no beautiful pumpkin pie.  So running to another store...I got this pumpkin pie...that is half the size of the first pumpkin pie, twice the money and didn't come decorated. So I had to figure out how to put the whipped cream on the pie!  How did I do?

Let me know and leave some love.  And get ready for that Thanksgiving Buffet!!  And you know where to get some beautiful images for your Buffet Table Signs....here at Scrapper's Delights

Cheers
Laurie

Monday, October 22, 2012

It's a Sketch Challenge!


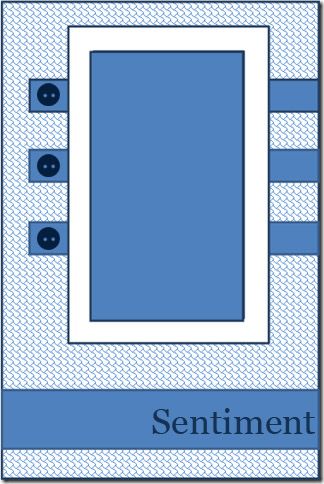
Hey everyone, lets play!  Using the sketch Below let's see what you can come up with. I love Halloween so October is a favorite month of mine to create.  I also love the spooky stuff. So in honor of that I went and made this cute little card using The Scrapper's Delights Grim Reaper digi.


I used Copic Markers to color in our little frightening friend. For his robe and scythe blade I used C3, C5, C7 and C9 from the Cool Grey Family. I used E07,E11,E23,and E31 from the Earth Tone Family for the scythe handle, and YR31 for his gloves.  The base, stripe and strips of card stock are from Carta Bella's All Hallow's Eve paper pack. The letter stamps are Harold's Letters from Lawn Fawn stamped in Memento's Tuxedo Black ink. The brads are from Stampin' Up.

And then I got a case of the sillies and my daughters and I decided that our Little Grim Reaper looked way to serious so we added googly eyes to him. Which then produced many giggles.

So now its your turn.....Show us what you can do with that sketch, it can be a card, a page, or a whatever you come up with. Head on over to the Scrapper's Delights Challenge Blog and check out the rules and then link your creation up there!
Cheers,

Wednesday, October 17, 2012

Operation Write Home's Midweek Throw Down Color Challenge

Hi everyone:

Here is my submission to the Operation Write Home 
Midweek Throwdown Color Challenge
It’s time for a color challenge and Doodle Pantry’s design team chose red & black with a pop of red or green!  We’re challenging you to make cards using black & white with a pop of red or greenfor our heroes to send home to their family and friends!  I really need to invest in a new camera or better lighting but as you can see the Lawn Fawn Reindeer has a bright red nose. The sentiment is from Stampin' Up. There is a bright red ball on the black and white gingham ribbon. I hope you like him! I made five of them to add to my box of cards to be shipped out to Operation Write Home.  Remember have fun, 
give our heroes your best...and NO GLITTER!
Cheers
Laurie

Tuesday, October 16, 2012

Lawnscaping Challenge

Hi everyone I love Lawn Fawn stamps and when I actually had time to partake of one of the Lawnscaping challenges...I got so excited! This challenge is to try a technique you have never tried
before.

When we moved into our new house 3 years ago I found a box of quilling supplies that I bought and thought...some day I have got to try this. Onto a shelf the whole box of supplies went, never to see the light of day until I saw this challenge.
So here is my attempt at quilling some snowflakes!

So this is what I came up with the cute little owl and the sentiment is of course Lawn Fawn. The coloring medium are Copic Markers.  The snow is glitter pen, stickles and quilling papers!

I hope this card inspires you!  And check out the Lawnscaping Challenge Blog
Cheers
Laurie

Wednesday, October 10, 2012


Halloween Treat Bags

Hey everyone!  I know we all love to use our digital stamps on cards and scrapbook pages to celebrate the holidays. I was thinking about that this week. I love this little witch, her name is Sabrina the Witch from Scrapper's Delights. I wanted to showcase her but I wasn't sure if I wanted to make a card. Neither one of my girls are going to dress up for Halloween this year, I guess 11 and 9 is now to old for such tomfoolery. <grin>  So what could I do with this digital stamp?  Well take a look at what I did!


I made candy bags for my girls classes. Yes, you can run a paper bag through your printer. All you need to do is reset the paper size to the size of your paper bag. I reset mine to 9" height and 5.5" in width.  Once that was set and I had our little witch placed on the page, I added the text underneath, the font is called Chiller.  I then taped the top of the bag closed and the flap from the bottom down. I then ran it though my printer! Yes! It was that easy.  Once she was all printed out, I colored her in with water based markers. Then filled the bag up with Halloween Treats, punched in two hole and tied with a ribbon. It was so easy and I just love the way it came out.  Such and easy afternoon  project and easy to make in bulk.  So there you go....just one more use for digital stamps. What are you going to try printing them out on?  And if you need more inspiration check out the other designers work at Scrapper's Delights Paper Craft Blog!

Let me know and leave a comment.
Thanks
Laurie

Friday, October 5, 2012

I Got Two Things Last Weekend


Intermediate Copic CertificationStandard Copic CertificationHey everyone. I got two things last weekend. Can you guess what they are?  And after taking a month off from the Scrapper's Delights design team, I am so happy to be back and at it again. So stay tuned...we have some really great stuff coming up. I am hosting a sketch challenge over there on the 21st! So check it out as well as the other team     members challenges. You know what to do...click on the following link.  http://scrappersdelightspapercrafts.blogspot.com/